What is Sudoku?
Wikipedia describes it as a
“logic-based, combinational number-placement puzzle. The objective is to fill a
9x9 gird with digits so that each column, each row, and each of the nine 3x3
sub-grids that compose the grid (also called “boxes”, “blocks”, “regions”, or
“sub-squares”) contains all of the digits from 1 to 9.”
When creating this simple
Sudoku Mini Quilt Wall Hanging, I encountered a few challenges:
- Selecting nine coordinating colors for the actual puzzle! Fortunately, I had my mother with me, an artist with a keen sense of color! The “tenth” color – I used a dark brown print - for the dark bold line separating the “sub-squares”.
- I purchased 1/4 yard each. I decided to use one of the colors as the backing, so that color I purchased a full yard. (I’m thinking with this size wall hanging, fat quarters would have worked just as well – but don’t forget about the binding, too!)
- Finding small prints to show up within the finished 1.5” square (the size I wanted)
- Keeping the “number” color separate/identified
I began by drawing out the puzzle on a piece of paper, then
color coding the squares to represent numbers 1 – 9.
Using “snack” size baggies, I marked a number on each
baggie, to keep the individual nine cut squares – per color - separate. Then I
began cutting out my squares!
What size individual squares
do you want finished?
Whatever that is, add
a half inch (for your quarter inch seam allowance!)
Following the diagram closely, I positioned each
“sub-square” together,
then stitched the pieces together.
The three rows then went to the ironing board.
On each sub-square, I pressed the center row toward the
center square. The two outside rows, press away from the center square.
Two sub-squares received the strip of dark brown, the “bold”
line, on the bottom.
I learned quickly to immediately sew the strip on the
appropriate line.
Always, always, always, as you go, check the placement
before sewing the sub-squares together… I had to rip out twice when I placed a
row up-side-down, which invalidated the puzzle!
Press Press Press (DO NOT IRON) - What's the difference? Read about it here!
Clip away all dangling threads
Once the “top” is stitched together, and the puzzle complete/accurate,
sandwich the batting between the top (right side up) and backing (facing
down).
I started out machine quilting (3.5 stitch length) simply
around the sub-square. It didn’t quilt it enough for me, so I continued with a
“stitch in the ditch” technique within each nine square.
I never can remember how to miter corners when binding. I
now have saved the .pdf document HeatherBailey so generously provided showing/explaining the amazing directions!
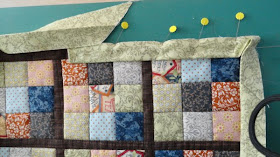
Then I went in search how to prepare the quilt for hanging
and found this delightful tutorial at PatchworkPottery. I did make my corners larger (7”) than what she suggested.
Happy Creating!


Cute idea! Thanks for sharing!
ReplyDeleteThanks, Susan! You are very welcome!
Delete