Showing posts with label technique. Show all posts

Saturday, January 7, 2017

Make your own Chenille fabric!

A new technique on my to-do list for 2017 ~ to make my own Chenille fabric like this:


I thought, How clever, when I happened across this blog article sharing this idea! When I was little, I had a chenille bedspread and loved it! I still have the chenille robe my parents gave me for Christmas at least 10 years ago!

It is something I will use in small projects, like on Action Quilts (aka Fidget Quilts) or zipper bags or potholders or pillows. Maybe a doll quilt, or mini quilt, but that’s about it. I do not intend on ever making enough for an entire quilt!

Through my searches, I discovered one can either use the same fabric for the multiple layers needed, or different prints on each one. It’s then the placement changes the entire color scheme!

On Stores Online, they used 3 different colors (then the base), and shows the three different results depending on placement! How cool is this?!

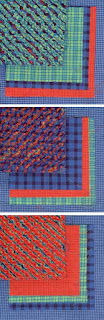
See how the other colors come through the top! Just love it!
I went to Pinterest and searched for Do-It-Yourself (DIY) to find more ideas / uses for Chenille!

At Peanut to Princess, she shows how to create the chenille, then use as an appliqué! Clever!


Oh, and then just strips of chenille, for other projects! At Kati’s Quilting, she shows us how to make the strips.

Then in Part 2, how to use them!

Of all the YouTube videos I watched to create Chenille Fabric, I enjoyed Mary Beth’s presentation the best!


The Olfa circular cutter shown on some sites like this from Walmart:


But, I’m going to use the Fiskars Scissors like Hobby Lobby (among the many places) offers! I think I will be able to handle gripping the cutter better with the spring scissors rather than the circular one.


Oh, and the “chenille brush” …


I’m going to see if I can find something around the house that will work just as well – maybe a firm toothbrush? It’s difficult for me to purchase something ~ anything ~ and have the shipping cost almost as much as the product itself! On one site I went to, it was triple the product’s cost!

Maybe I’ll stumble across one somewhere, sometime!

I’m excited about trying this technique!

Let me know if you try it as well!!!

UPDATE:  I purchased a "Utility Dish Brush" while at Walmart and hope it works just as well as the "chenille brush"!!


Tuesday, September 6, 2016

Stack and Slash

There are many aspects of creating a quilt top I’ve yet to tackle. Two techniques come to mind immediately. One is the Stack and Slash method. The other, is creating a T-Shirt quilt.

Today, I’m researching the different tutorials available for the Stack and Slash (also called Stack and Whack) and want to share my findings with you as well! Have you created a quilt top using this method? I would love to hear any points and tips you’d like to offer! Please, leave a comment!

I’m a visual learner. Or, I can listen to someone explain how to do something, and remember the instructions ~ usually! Reading the instructions and then following them to the T, is a struggle for me.

Understanding this about myself, I need to find different ways to get to the same end.

This diamond quilt was ~ sort-of ~ using the Stack and Slash technique –


But not really…

I’d like to create something catawampus and fun!

The Stack and Slash technique is different from how I created this crazy quilt:


At Svetlana’s blog, S.O.T.A.K. Handmade, I found an informative tutorial (complete with photos!) using 6 different coordinating colors. This is her quilt top:


To start, each piece is cut 16” x 16” (so, I’ll pick up 6 fat quarters during the upcoming quilt shop hop *road trip!), then perfectly stacked together with the right sides of all the fabric facing the same way, up!

I know when I try this, I will need to go very very slowly, with no television on in the background, and follow the step-by-step instructions she provides.

This slowness will be especially important during the restacking aspect! You’ll understand what I’m talking about once you’ve read her tutorial underneath her picture:


I went to Pinterest and searched “Stack and Slash tutorials” and found many more ideas and methods!

The bright reds and pinks caught my eye on this one by Ms. Elaineous (isn’t that a clever name!):


It has fewer pieces to cut (only 5 times rather than the 9 on the one above) and just may be an easier one for me to start with when trying this new-to-me technique.

Then I went to Youtube! I’m so thankful for folks taking the time to create videos for those of us visual learners!

Oh! My!


This looks like a good one… I don’t have the bandwidth here at the ranch to watch it myself – not until I get somewhere with unlimited wi-fi availability!

Anyway, this is something I’m going to try out. I know I can!

Will you?


*road trip set for September 13th (one week from today!!!)... stay tuned!


Saturday, September 28, 2013

Honeycomb & Gusset

There are a couple of details I’ve wanted to work into a project, but haven’t made the time to learn how! One is honeycomb smocking and the other is inserting a gusset into a bag. I’m so excited! I found on the Internet excellent instructions for both interests!

When I’m back at Lanetta’s Creations’ studio, these will be on the top of my to-do list!

I enjoy seeing/reading how different folks explain the same basic thing. Everyone puts their own flare on creating a technique. Learning tips and tricks from here and there, is always a good thing!

For the Honeycomb smocking technique, try one (or all) of these sites:


And, Sam, over at The Handmade Dress, even created a video for us! Thank you, Sam!


I don’t know about you, but I’m so tired of plastic shopping bags! I know they serve a purpose, and I need to get my surplus over to the Food Bank! They are always sending a call-out for more bags!

I’ve planned for years to create sturdy washable bags to carry back and forth to the grocery store. I’ve made totes and handbags and messenger bags before, but have never tried inserting a gusset. With the instructions I found at The Haby Goddess, I will certainly get moving on this project!


What’s on your to-do list to learn?

Thursday, January 3, 2013

Ninth Day of Christmas


On the ninth Day of Christmas, my true love gave to me, Nine Ladies Dancing! Now this I can see why the author of Twelve Days of Christmas depicts ladies dancing and celebrating the Nine Fruits of the Holy Spirit.

Paul shared the nine fruits of the Holy Spirit when he wrote to the Galatians:

Love ~ Joy
Peace ~ Patience
Kindness ~ Goodness
Faithfulness
Gentleness ~ Self-control

(Galatians 5:22-23 ESV)

Source: Simply Homemade

Although this is a cake wrap, I can envision other uses with the technique. With a bit of supplies, a printer, and lots of patience, wouldn’t this be a lovely way to share/preserve memories?

I’ve added this to my “to-do” list! How about you? Will you try it?

Total Pageviews