Tuesday, December 31, 2013

2013 - A year of ups and downs

My goodness, 2013 has been a whirlwind year of ups and downs.

Since January 28th ~ the night the Lord called Daddy home ~ life has not been the same. It never will be again. It’s different, and that’s the way life goes. To say the least, finding the new normal for us left behind has been challenging. I know time heals. I’m sure once we get through all the “firsts” the dealing of our new life will get easier.


I spent the month of February and a bit of March away from the studio, helping my mother. Although I had temporarily closed my ArtFire shop, I received a special order request via email for four “cupcake” half aprons. It was a timely Godsend distraction. I was so grateful to work, to create something, to sew, to think about something other than missing my Daddy, and what my momma must be going through after almost 66 years of marriage.   

Upon my return home, and back to my studio, I was able to focus on something I’d never done before! It was certainly an “up” moment! I had been invited to give a book review of my first novel, Where Forever Begins, A Simple Love Story!
Available for Kindle, too! 
Amazing! Folks said I did a good job. I don’t remember much as it’s a blur!


I did sell and sign quite a few books (a good thing!) and someone invited me to speak for another group in 2014!

Then, Momma's refrigerator started leaking & flooded her kitchen floor... so, back to Dallas and my sister & I spent Easter Sunday replacing her flooring!
I think we did a pretty good job!
Looking back over this blog, I didn’t write much this year. Things kept happening and it was hard to stay positive, upbeat, and inspirational.

In March, I remember working on a quilt kit my sister had given me, and wrote a bit about it. It was great sewing therapy for me as I didn’t have to come up with my own design… simply follow instructions.

Then I found out my baby niece had melanoma.
(I’m happy happy happy to report after surgeries & treatment, she’s doing great!)
 
2008 - at her PhD reception! 
It was hard living miles away from her, during this discovery, surgeries, and healing time. I wanted to make something to give her, to give her hugs, to comfort her. A long time ago, she turned me on to working Sudoku puzzles. So, I made her a mini quilt wall hanging depicting a completed Sudoku. To help me stay focused and positive, I wrote a tutorial how I designed and created the wall hanging.


In April, Momma came to the country for a nice visit...

Love when she uses her watercolor pencils and creates a lovely picture!
And, she's able to relax!
And, begins to sew again!


And, examines the Keyhole Garden!
I was “up” again when planning for the Lampasas Spring Ho Parade and making all the dolls new clothes to wear!


This was during the time momma went to Hawaii, joining my oldest niece for a week in paradise!


And I managed to design & create an apron to enter in the Lampasas County Fair, as well as the State Fair of Texas.


Then ~ July 9th ~
Momma slipped attempting to get on a massage table... ambulance ride to the hospital…

Back to Dallas to help…

After spending a few days in the hospital after surgery to repair her broken femur, then to a rehab facility, I did make a quick trip back home for a few days and participated in the Lampasas Spring Ho parade.


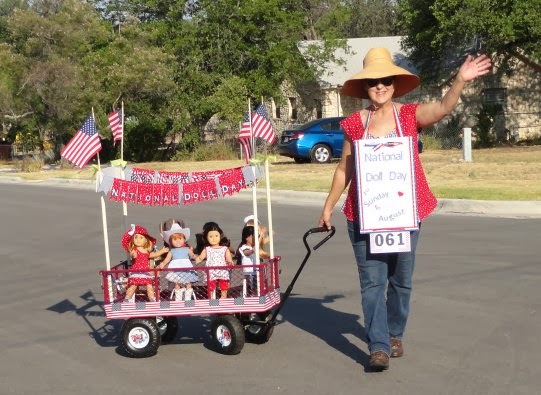
We did win 2nd place in our category!
(NOTE TO SELF: Walking a parade route, pulling a garden wagon – July in Texas – must re-think next year!)

Back to Dallas... 
The neglectful rehab facility almost killed her… four days without the ability to swallow, take meds of any sort (especially pain medication)… we got her out of there and to her gastro doctor. He sent her straight to the out-patient clinic for an upper GI Endoscopy and found the obstruction, got it taken care of, then another one several weeks later for check up – meaning three doses of general anesthetic within two months… not a good thing for anyone, much less someone 84 years young!

Well, we got through August. After spending ten days at my sisters, Momma & I came back to her house for continued at-home therapy and recuperation time... 


and, that's when I started my first Quilt of Valor quilt while she and a friend worked on their drawings...


Because September is National Sewing Month, and in between caring for Momma, I forced myself to write an article per day… it was such a struggle to stay positive, hopefully share something of interest.

When I got home in October… back to the studio… I managed a few more articles, and sewing projects that I had previously written about – trying to stay focused and positive.

It’s then I can see my priorities changed.

Lanetta’s Creations ArtFire shop will remain open, praying the inventory of aprons, doll clothes, and other items offered will eventually sell. I can’t see making any new items for my shop.

I just don’t have it in me any longer to market like I should.

I will gladly do custom orders, or special requests for items in specific colors and sizes.

This doesn’t mean I won’t be sewing! I love to sew! It’s my stress reliever! It’s the way I keep sane. My dream has changed a bit, yet the focus remains…

In 2014 and beyond, I will sew to help others, to bring them comfort, to offer warmth and joy.

Thanksgiving was held here, at the country, with Momma, Bud, and my girls...


And we had a very nice Christmas at Momma's
Especially because my sister & I decided to focus totally on Momma this year...


Then the next day, baby niece & her husband, one of her son's (tallest), and his friend, came over to celebrate another day of Christmas! Before the festivities began, the boys escorted Momma across the street to deliver homemade cookies fresh from the oven to our dear neighbors and friends. (First time Momma's walked across the street since before she broke her leg!)


We had a great extended Christmas this year. We missed Daddy terribly, but we found great comfort knowing he was spending his first Christmas with Jesus.


I am thankful for my loving, sweet momma,
who taught me to sew, how to love unconditionally, and for her never ending support.

I am thankful I had a loving, kind, gentle Daddy for almost 60 years,
who taught me courage, gave me strength, and love of my country.

I am thankful for a loving and supportive husband,
and the beautiful daughter he brought into my life.

I am thankful for my sister,
especially for giving me two sweet dear nieces
I feel as though they are my own daughters.

I am thankful for my extended family,
and the friends I have in my life
- past and present!

I am thankful for my two girls, Beth and Anna,
for the joy they bring to my life.

And, most importantly,
I am thankful I know God.

Through all the ups and downs, I am blessed.

May you have a fabulous 2014! 

Tuesday, December 10, 2013

Chasing Dreams


The vision was nice while it lasted. I’m awake now. Sometimes dreams don’t work out… that’s life. Move on. Deal with it. 

Saturday, December 7, 2013

What Can I Do?

Thursday I went to a meeting. While waiting for all to gather, the lady sitting next to me began sharing how she was part of a volunteer group that spent the day before helping a family displaced by a house fire. Everyone got out safely, but the fire totally destroyed the home. Long before the large emergency agencies arrived, her group saw to it the family had the basic needs – a place to stay, food, and some clothing. My heart and prayers goes out to this family. My heart swells with love knowing this group quickly took care of them.

What can I do?

I can make quilts!

In between creating Quilts of Valor for our Veterans and Wounded Warriors, I can make quilts to wrap around those facing unimaginable loss. Yes! I can help fill the trunks of first responders with quilts of all sizes and colors.

I made this quilt, then realized the size doesn't meet QOV minimum requirements.
It's tied, which is also unacceptable for a QOV. It's somewhere in my sewing room.
I'll take it apart and quilt it once I have a long arm machine!
Someday, it will be perfect to wrap around someone's shoulders needing a hug.
Until then....

Creating a quilt top is cutting out fabric then basic sewing with a sewing machine. It’s the quilting process that gets tricky. The process of tying a quilt is okay, but it will not last for generations. I physically cannot hand quilt, and is why I need a long arm quilting machine.

Folks experienced with long arm quilting machines report a queen size quilt takes maybe 8 hours to complete. Lap quilts would take much less.

Although I couldn’t be at the heartbreaking scene, a quilt would give them my hug of comfort. That’s what I can do.


Will you help me help others? Please, consider donating any amount to my funding campaign for a long arm quilting machine!

Saturday, November 30, 2013

New Thanksgiving Experience

I read so many heartwarming stories and well-wishes on Facebook over the Thanksgiving holiday. It’s been wonderful to read through them all. Although several of us had a totally different from “traditional” experience, I’m grateful an abundance of gratitude resonated across my online community.

In my home, some traditions stayed the same…
Someone always takes a pinch from the rising yeast rolls!

Anyhoo…

I’m part of the Facebook group, Quilt of Valor, and over the past few days, a member shared what her family did over Thanksgiving. She said it’s a new family tradition - a "Thanksgiving Collaboration" - started this year. I thought it was such an amazing project that I wanted to share with you!

Three generations contributed to the endeavor. They made the quilt blocks, then they assembled the top, sewed it together, created the border, and then she loaded it in her longarm quilting machine! One of her last entries stated the quilt was DONE (meaning QUILTED) before “time to get the dinner on the table.”

Thank you, Lori K. (Washington), for letting me share your pictures!

“We” – Momma & me, with my husband "supervising" – worked on the border for one of the three quilts Gail and I assembled from the blocks created by Lori and Dona (sent from California). It's one quilt from the "Just One Block" Community QOV project. We had a grand time while creating a new Thanksgiving experience.

Next year, I will have a longarm quilting machine and Momma will see a quilt TOTALLY finished while she’s here visiting over Thanksgiving!

Have you wondered?

Steps toward making one QOV:
  1. Purchase fabric for top, backing, and batting
  2. Pre-wash/dry/press fabric
  3. Cut out
  4. Sew pieces together making blocks
  5. Assemble blocks, attach border
  6. Load into quilting machine
  7. Quilt
  8. Bind
  9.  Label
  10. Wash/dry finished quilt
  11. Create presentation case to hold the quilt (a pillowcase)
  12.  Have quilt blessed during church service
  13. *Present Veteran with quilt


One week worth of work, that’s it, to do #1-12.

At least 52 quilts per year!!! And, that’s only if I made the quilt top myself! If others make them and send them me to quilt, I could do so many more in one week/month/year! How wonderful would that be!?!?!
*Number 13 may be a few weeks, or a specific future time with multiple finished quilts when many Veterans receive quilts at once, like during an American Legion special event, or to answer a call-out. For example, my Region 4 coordinator needs 50 quilts before February 1-2, 2014, for presentation to Naval Reservists Returning, RWW Honor Banquet in Austin.
Without having a quilting machine, the minimum time to create a quilt from start to finish is 30 days. That’s only 12 per year, if I’m lucky!

This is why I started the funding campaign to help finance the long arm quilting machine…will you donate a dollar?

Thank you!


Wednesday, November 27, 2013

QOV Community Update!

Head over to the So Sew Etc blog and read about our Community QOV Project! I'm so excited! You will be, too!

Quilt blocks created and provided by Lori & Dona from Auburn, California!

Wednesday, October 30, 2013

Just One Block

UPDATE: Thank you all for participating in this endeavor! I'm in the process of assembling the fourth and final quilt top for this project!

I listed first the Quilts of Valor Foundation in my Community Service article back in September. Yesterday, while working on a scrappy quilt for the QOV National Service project, a light bulb went off...  actually several went off (with the help of a friend!). But, for now, I want to share, and ask of you… will you make just one block for a QOV?

Maybe you want to help, and say “Thank you for your service, your sacrifice, and valor,” but don’t have the time to create and piece together an entire quilt. Maybe you can do just one block in a matter of minutes, then mail it to me!

There is an urgent call-out for more QOV since the Nightly News did a piece on this fabulous endeavor last Monday (10/21/2013).

I will collect the blocks, put them together, and get it quilted & finished according to their specifications. I will share pictures of the finished project with everyone!

What I need in just one block (based in part on their requirements):

š                  Use PRE WASHED high quality 100% cotton quilting weight fabric appropriate for an adult.
                              Do not use sheets (bedding), thin, stiff, metallic or scratchy fabric.

š    9.5” x 9.5” block – in any design you would like to create using RED WHITE AND BLUE colors!

  š  As customary in quilt making, a ¼” seam allowance is used.

Need ideas for a block? I did a google search and found quite a few “free quiltpatterns” !!!


Please consider helping me get another quilt together by making just one block!

Thanking you in advance! Send me an email when you need my address!

Monday, October 21, 2013

Accountability to Myself

Working up my three “game plan” agendas before I left Dallas and returned home, able to get back to the studio, was the best thing I could have ever done! It so helped me stay focused on things I wanted to accomplish ~ besides a bit of housework and home renovations! Part1 is now officially done!

I created Momma’s phone pocket necklace and got it in the mail to her on Tuesday (Monday was Columbus Day, so no mail)… she loves it! I will see her this week and will take a picture of her wearing it! But, for right now, this is what it looks like…


I think he’s a cutie! I couldn’t follow the pattern/materials per se on the owl pincushion, but I don’t think anyone will notice! I didn’t have any yellow felt, so had to use the thin foam board for the beak and feet. It sews beautifully! Also, I wish I had used the more solid looking pink for the body’s front and the noticeable print for the pocket. Didn’t “see” the difference it would have made before I stitched it all together! Her instructions were clear and easy and had a bit of humor sprinkled throughout. I didn’t have anything she suggested to add weight to the bottom after stuffing… so I used washers (like bolts and washers, washers) from my husband’s workshop! He’s not fallen over once!


My first project working with Pet Screen went well, but will use a bit more screening in the next creation! I love the fun print on this one and wanted more of it to show. 

Scary zippers aren’t as scary any longer! I didn’t use a pattern, just based the bag on the size of the zipper! I like the angle of the print I’ve seen on other bags and just did my own thing on this one. I believe a fun zipper pull is called for, but haven’t yet decided what to make… still thinking about it!


Oh, My! This is what happens when you take a boring lamp & lampshade and turn it into something magical…
Boring!


Magical!


With my 1.5” left over scraps, I stitched them together, machine quilted, then applied a binding… and made a “mug rug” which works beautifully with my mouse!


And, now my sewing room will always have a yellow rose….


I have finished the First Christmas gift and I’ll get it in the mail tomorrow! Once received, yes, it’s an early gift, I’ll post pictures! Even if it’s not liked, or wanted, it’s the thought that counts! Right!?! At least, I created it with lots of love.

Okay. I’ll be honest. The fabric origami wallet didn’t turn out nicely. I don’t like the way the wrong side of fabric shows when no bills are in place. I’ve pressed out all the folds and will just do something else with the bandana fabric! Maybe someday I’ll try another origami design.


More shopping bags… a long way to go….

1,612 to go!

Tuesday, October 15, 2013

The Gibbs Slap

Fans of the television show NCIS will know what I mean. It’s a wordless, “What are you thinking?” or “Snap out of it, now!” or something not as nice like, “Get your head out of your a$$!”

Rule #5

I thought it would be a good thing…

For a while now, I’ve been contemplating a new direction for the business side of Lanetta’s Creations. Yesterday, I started gathering information, searching the Internet for “how-to” this and that, the legalize necessary to turn a dream into reality, and began a cost sheet.

Then it hit me…

The mental Gibbs Slap caused by my own hand!!!

What am I thinking? I’m considered a “senior” in lots of retail stores… and I’m thinking about starting a new-to-me endeavor with high start up costs?

Snap out of it, now! Goodness gracious! Get over it and just move on… it’s too late…

I won’t go “there” as to the last one as it’s a little dark!


Sunday, October 13, 2013

Sewing Groups

Are you part of a sewing support group? With access to the Internet, it doesn’t have to be a physical group, where you travel somewhere and gather with like-minded folks in person. In this day and time, virtual groups are but finger tips away! I’ve found some on Facebook, groups.yahoo.com, and I’m sure others are out there.

A while back, I created an open group on Facebook. The Sewists Group “about” states:


This is a support group of like-minded folks to talk about the love (and sometimes the frustration!) of sewing, receive help on any issues/problems related to sewing, and share ideas/links!


In September, I don’t know how I found them, but I stumbled across the Facebook group, Sew Modern Dallas Chicks! They meet at various places around Dallas (like a Hobby Lobby) as well as have online challenges! I didn’t get a chance to attend a gathering while in Dallas, but I do intend on participating in their October online challenge!

Their “about” states:
This Dallas-based sewing group is for beginners through advanced sewists. Do you want to learn or love to sew, quilt, embroider or any other artsy sewing? We sew just about anything from clothing and fashion accessories to home decor! We meet at a few stores around the Dallas area (primarily the North Dallas area) to learn the basics to advanced techniques. We also have open sewing known as ‘Saturday Sewing Socials’. We occasionally attend area sewing events.

If you’re on Facebook, how do you find sewing groups?

Search “Sewing”
Refine the search by clicking “Groups”


Scroll down the list! To see more, click the down arrow (bottom center of the list) to load more!

Don’t fret if it says “Closed Group” – click “Join” if the description suits your fancy! As soon as you click join, it changes to “Request sent” and most likely, after the group’s administrator sees your request, you’ll be approved! The group name will show up on your “home” Facebook page.

Once you’re in a group, if you don’t think it’s worthwhile, simply click “Leave group” and it’s done!


For me, groups on Facebook are much easier to find and become part of the discussion than Yahoo.

Do you have an online group? Are you part of a group that you would like to recommend? I love learning from others and see what others are doing!

P.S. Since I posted this article, I found & joined two more groups on Facebook!

  1. Sewing Tote Bags and Purses
  2. Sew Many Sewing Friends


Friday, October 11, 2013

Lacy Flowers

Strips of fabric, scissors, small circle of felt, and a glue gun! That's it! I just discovered A Little Shabby Chic - and had to share!


 I can't just watch one...

And....
there are so many others sharing their techniques!

Monday, October 7, 2013

Game Plan - Part 3

When I return to the studio, I don’t plan to “cross the cattle” guard for a good while! I hope it works out this way! (It's already changed! Must attend training to work the November election! Oh well, at least I'm working!) Setting up a game plan has been a big help to keep me focused and on point. After I get a bunch done shared in Part 1 and Part 2, I plan to create a few things I found during the September long National Sewing Month’s celebration ~ for myself.

I recently made a camo handbag but it needs to be a bit larger for all the stuff I carry around with me. The next one will have an internal zipper like Craft Passion explains in her tutorial.

Although summer 2013 is over, I think the wide brim hat is perfect protection from the Texas fall/winter sun rays as well. Before I start the much needed work on our keyhole garden before winter hits (readying it for a spring garden), I need something like this. I’m thankful The Weekend Designer provided a great tutorial.

I have a bit of muslin fabric in my stash I’m sure won’t be used in the other projects previously listed/planned. I believe it will be perfect to try my hand at printing… oops, reminds me, I need to put celery on the grocery list! Wonder what I could make to display the original printed fabric? Maybe a pillow?

I know I have to wait a while before tackling the suitcase. I would love to work on it, to get it done to help organize my dolly things, but I must place it on the bottom of my list. 

And, Last But Not Least … I want to learn how to use my new embroidery machine!!!! I need quiet time to study and practice…

Now, something fun for you…
  • When you see a post on my Facebook page, something like: “Part 1, DONE” or “Part 2, DONE” etc. ~ you’ll know what I’m talking about!
  •  Be the first to comment on my Facebook page, mentioning at least three (3) items I should have completed to be “Done” and win a handmade prize!
Good luck!

Sunday, October 6, 2013

Game Plan - Part 2

I’ve already started a few of the Community Sewing projects mentioned previously.

A Veterans scrappy lap quilt is in the works. I need to finish it up before I get into the box of scraps I’ve set aside for it and do other projects with them instead! I started it back in August/September when I had my sewing machine in Dallas, while caring for my mother. After completing only two rows, I decided my back needed my normal cutting island rather than one of her regular dining tables. I had to put it on hold until I can dedicate the time to finishing!

While back at the country on a short visit last week, I could not not sew! So, I created a few shopping bags. They are similar to the Green Bag Lady’s, but a bit more finished & detailed. I completed five and have an additional five cut out & ready to sew but ran out of time due to helping with house renovation projects. Anyway, I may take the time to do some appliqué on a few of the bags! Or, at night while watching television, I could weave some ribbon fishes for a bit of embellishment!

My goal is to provide everyone in my little town a shopping bag! According to the 2010 census, I have 1,617 more to make!

I’m thinking… I may need to re-think that goal unless I get some help! I can see an assembly line and not everyone participating has to know how to sew! Cutting out and ironing/pressing would be awesome help! Maybe I can get a small group together! Wouldn’t that be a great winter project to do for and with the community?

Anyhoo...

In addition to the shopping bags, as I pull out to work a box or sack of fabric that family and friends have given me, I’m sorting the larger pieces to use in creating fun pillowcases. None are cut out ~ yet ~ but I know where I stacked the dedicated pillowcase fabric pieces!

I don’t remember how I found them, but I contacted Volunteer Match. I found a call out for sewing items I could create and simply mail to the organization for distribution where needed. Something called dignity scarves caught my eye. Come to find out, they are similar to my Wearable Napkins! So, I’ll use some of the larger pieces of fabric to create a few for their needs.

Working on a few more ideas.

Part 3 is a "work in progress" game plan to get things done and seriously downsize my stash!

Saturday, October 5, 2013

Game Plan - Part 1

The other day I wrote, Name This Post, basically stating I had so much to do, so little time. I was totally confused as what to do, where to start first, etc. It was my way of asking for help! I know, I know! I’m on my own to figure it out!
  
I decided to go back through September’s posts and pick out the different things I shared and would like to do first, second, etc. So...

When I get back to the studio –

Before I do too much of anything else, I must design/create a phone pocket necklace, and get it in the mail back to Momma! She’s always forgetting to carry a phone with her, or when she does remember, she sticks the phone in her pants pocket & inadvertently pushes the “on” button or it slips out of her pocket into the chair! I totally forgot while she was visiting with us at the country last week! Should have done it then! Oh, well!

The Owl Pincushion is my all time favorite as it uses different scrappy fabrics and a variety of stitch applications. I can’t wait to get this made and use it while I’m creating everything else!

I found/bought some black Pet Screen at Home Depot (I know, black is not as fun as a “color”) but the fun print I’m going to use with it should work out nicely. I need a bag to carry my sewing supplies back & forth to the quilting club gathering I hope to get back attending when things calm down. On this one, I plan to use the open wide zipper technique Noodlehead shared.

I’ve mentioned several times… I have lots and lots of scraps. After cutting something out, if I have even enough to make a yo-yo from the tiniest scrap, I toss it in a box. After finding out about this clever lampshade, I can use the long scrap leftovers, not wide enough for a yo-yo! Okay, need another box for my upcoming collection. I have an ugly shade stashed away I’d like to recover and this will be perfect in getting my sewing room reorganized and prettied up!

Speaking of prettied – for me, I need to also make some long-stemmed flowers for my sewing room. I think I can spare 5” x 45” cuts off of some fabric before making into a pillowcase or shopping bag or wearable napkin. I’m thankful Snowy Bliss showed how to make them!  

I have a bit of Christmas Sewing I need / want to do. It won’t be too much this year… but I have this Hawaiian print I want to create something totally unexpected. I have a game plan… but I can’t share any more until after Christmas!


Another Christmas idea, after I make one for myself out of camo to match my handbag, is the origami wallet I found while writing about fabric origami projects. Bee a ba explains very nicely how to create it! I can’t wait!

Stay tuned for Part 2! I'm still working on it!


Thursday, October 3, 2013

Name This Post

Who is on first?
What is the priority?
When is the best time?
Where are the answers?


So much to do.
So little time.


Monday, September 30, 2013

The End

Especially during September ~ National Sewing Month ~ I enjoy searching for new (to me) ways of sewing. Always wanting to sharpen my sewing skills, I never want to stop learning new tricks of the trade! I like purposefully looking for creations I’ve not yet done and add them to the never ending to-do list. Various times during the life of this blog, I’ve shared plans of doing this or that. Some I’ve completed, some still wait.


This month-long celebration is no exception. I’ve found plenty more sewing projects I want to try, techniques to implement, and goals to reach.

More to-do’s ~ in between everything else ~ why not?

Thank you for sharing this month with me. I hope you found the articles informative. It is my hope they will inspire and encourage you to sew sew sew!

If you’re looking for me – I’m sewing!


Sunday, September 29, 2013

Print Your Own Fabric

Have you tried printing your own fabric? I’ve only done the tie-dye method, decades ago. Of late, I’ve seen some really interesting articles about designing and creating the print by other means ~ adding personal touches ~ to the project.

I didn’t have a clue how to do this, other than the “tie-dye” method, until I went on a mission around the internet!

The first technique that caught my eye, and gave me the inspiration for this article, was when I stumbled upon a short video clip from Better Homes and Gardens! They used celery to create a fabric stamp… that looks like a rose!


Then I went to YouTube and found lots and lots… like this one from Super Simple with Terri O (although I couldn’t find it on her actual website – and the search feature didn’t find it – but I found lots of other cool projects unrelated to sewing…but I digress…)


wikiHow provides the steps and tips and techniques to Make Your Own Fabric Prints. I will re-read this one before starting a project!


Poppytalk had a guest blogger, Karina Manarin, who gave a STEP-BY-STEP pictured tutorial “DIY: Print Your Own Fabric”!!! This is so doable!!!


I’m thinking a lot of us have used the trusty raw potato as a print stamp at one time or another. Sew Daily has a great article, “Simple Tips for Hand printing Your Own Fabric, Prints Charming” that is a good reminder of tips and techniques. It’s a must re-read once I get the potato out!


FYI: I’ve done this a couple of times ~ used my printer for small projects. If you want to use your ink-jet printer, wikiHow has a nice article explaining the process.

Taking it to the next level –

Okay, now you’ve created the most awesome print design ever and you want to get it professionally printed by the yard! There are companies that do this!

Kim over at True Up wrote a great article “My Big Digital Fabric Printing Experiment” comparing the four major production companies. I will re-read this post if ever I want to pursue this further! I noticed reading the comments were also helpful!  And, then her updated chart!


Have you printed your own fabric? What projects did you create? I can hardly wait to try my hand with printing my own fabric!


Total Pageviews