Monday, September 30, 2013

The End

Especially during September ~ National Sewing Month ~ I enjoy searching for new (to me) ways of sewing. Always wanting to sharpen my sewing skills, I never want to stop learning new tricks of the trade! I like purposefully looking for creations I’ve not yet done and add them to the never ending to-do list. Various times during the life of this blog, I’ve shared plans of doing this or that. Some I’ve completed, some still wait.


This month-long celebration is no exception. I’ve found plenty more sewing projects I want to try, techniques to implement, and goals to reach.

More to-do’s ~ in between everything else ~ why not?

Thank you for sharing this month with me. I hope you found the articles informative. It is my hope they will inspire and encourage you to sew sew sew!

If you’re looking for me – I’m sewing!


Sunday, September 29, 2013

Print Your Own Fabric

Have you tried printing your own fabric? I’ve only done the tie-dye method, decades ago. Of late, I’ve seen some really interesting articles about designing and creating the print by other means ~ adding personal touches ~ to the project.

I didn’t have a clue how to do this, other than the “tie-dye” method, until I went on a mission around the internet!

The first technique that caught my eye, and gave me the inspiration for this article, was when I stumbled upon a short video clip from Better Homes and Gardens! They used celery to create a fabric stamp… that looks like a rose!


Then I went to YouTube and found lots and lots… like this one from Super Simple with Terri O (although I couldn’t find it on her actual website – and the search feature didn’t find it – but I found lots of other cool projects unrelated to sewing…but I digress…)


wikiHow provides the steps and tips and techniques to Make Your Own Fabric Prints. I will re-read this one before starting a project!


Poppytalk had a guest blogger, Karina Manarin, who gave a STEP-BY-STEP pictured tutorial “DIY: Print Your Own Fabric”!!! This is so doable!!!


I’m thinking a lot of us have used the trusty raw potato as a print stamp at one time or another. Sew Daily has a great article, “Simple Tips for Hand printing Your Own Fabric, Prints Charming” that is a good reminder of tips and techniques. It’s a must re-read once I get the potato out!


FYI: I’ve done this a couple of times ~ used my printer for small projects. If you want to use your ink-jet printer, wikiHow has a nice article explaining the process.

Taking it to the next level –

Okay, now you’ve created the most awesome print design ever and you want to get it professionally printed by the yard! There are companies that do this!

Kim over at True Up wrote a great article “My Big Digital Fabric Printing Experiment” comparing the four major production companies. I will re-read this post if ever I want to pursue this further! I noticed reading the comments were also helpful!  And, then her updated chart!


Have you printed your own fabric? What projects did you create? I can hardly wait to try my hand with printing my own fabric!


Saturday, September 28, 2013

Honeycomb & Gusset

There are a couple of details I’ve wanted to work into a project, but haven’t made the time to learn how! One is honeycomb smocking and the other is inserting a gusset into a bag. I’m so excited! I found on the Internet excellent instructions for both interests!

When I’m back at Lanetta’s Creations’ studio, these will be on the top of my to-do list!

I enjoy seeing/reading how different folks explain the same basic thing. Everyone puts their own flare on creating a technique. Learning tips and tricks from here and there, is always a good thing!

For the Honeycomb smocking technique, try one (or all) of these sites:


And, Sam, over at The Handmade Dress, even created a video for us! Thank you, Sam!


I don’t know about you, but I’m so tired of plastic shopping bags! I know they serve a purpose, and I need to get my surplus over to the Food Bank! They are always sending a call-out for more bags!

I’ve planned for years to create sturdy washable bags to carry back and forth to the grocery store. I’ve made totes and handbags and messenger bags before, but have never tried inserting a gusset. With the instructions I found at The Haby Goddess, I will certainly get moving on this project!


What’s on your to-do list to learn?

Friday, September 27, 2013

Why Not?

Why not enter a sewing competition? I asked myself this question a few years ago. Have you thought about it? Why not do it? A county fair maybe?

Before I go any further, I must add that today is OPENING day of our Great State Fair of Texas! The fair will run from today through October 20th. You've not been to a fair unless you've been to the Great State Fair of Texas! (My Humble Opinion!)

Years ago, Momma entered the sewing competition at the Great State Fair of Texas. Back then, winners modeled the outfits created. I remember like it was yesterday, sitting in the audience with my daddy, watching as she walked down the runway. I will always love that two-tone iridescent mauve petal skirt cocktail dress! Another time, much later, she entered a wedding dress she and I designed together. I had the honor of modeling her award winning creation. Within a few months, a knock-off showed up in Lester Melnick’s store window!

I so wish I had a photocopy of both creations… oh well.

It took me many years to gather the courage to follow in Momma’s footsteps. Yes! I finally entered the Creative Arts Competition! I decided 2011 would be a fabulous time because it was the fair's birthday celebration! Can you imagine 125 years? The Great State Fair of Texas has provided all attendees with fabulous memories over the years. I have the special memory of seeing my apron, bag, and doll dress, on display during the 2011 fair!

I also entered an apron and doll dress in 2012. More memories added…

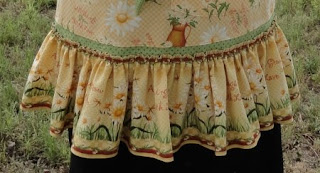
It’s 2013 now, and I entered the competition one last time with this apron. I can hardly wait to add seeing it on display to my memory bank!

All Things Grow With Love... 


Back in August, I entered this same apron in my local county fair! I was THRILLED beyond words when I learned it received first place, and the Grand Champion award for the category! I was excited to see it on display during the fair, to create a new memory!


Will you enter next year in your county fair? Why Not?

Thursday, September 26, 2013

Pass It On!

Do you know how to sew? Can you work a sewing machine? Do you understand the basic sewing instructions found in a pattern? I ask these questions because if you’ve answered yes to all three, then pass it on! I assure you, explaining and teaching the basics to someone else is very rewarding. One is never too young, or old, to learn how to sew!

When old enough to sit on a lap, the basics can begin!

I remember sitting on my Momma’s lap while she made my sister’s “back to school” clothes. Although I was probably only two years old, this experience is one of my first memories. Of course, it took years for me to understand the principles but the love for sewing began early.

The summer of 2012, I had the honor of teaching a few sewing basics to a small group of young ladies.


During Sewing Camp 101, we made a drawstring bag, a pillowcase, and a waist apron. They did so good, too! I hope to continue “So Sew Etc” again someday, maybe next year things will calm down a bit.
I created the So Sew Etc Facebook page. In the “notes” section you’ll find the registration form and instructions I created. Feel free to modify and use for your class! You’ll see the photos, too – all the serious expressions followed by genuine smiles – priceless!

When one teaches, two learn. – Robert Heinlein

 A couple of things the “next generation of sewists” taught me to explain straight away:

Although the sewing machine’s wheel turns both ways, only ONE way is the RIGHT way! Oh my goodness… I had forgotten how quickly the bobbin housing can get all out of whack when turning the wheel the wrong way! Talking about a major stand still when this happens… if I recall correctly, all five ladies did the same thing at the same time! Total shut down!

“Speeding” was another issue we had. I finally realized, when home after the first day and talking about it with my husband, I should explain the proper placement of the foot on the machine’s pedal to better control the speed. The next morning, I gave them the example used when learning to control a vehicle’s accelerator (heel on floor, base of foot/toes controls the pressure). Although none were of age to drive, they will already have this bit of information to carry when they do learn to drive! ;)

For a refresher on basics, and beyond, I highly recommend the Sewing.org website where you’ll find SEW-lutions Guidelines, educational articles on just about everything there is to know about sewing!

In the spirit of “pass it on” – enjoy!


Wednesday, September 25, 2013

Sewing for Seniors

I’ve seen oodles of websites offering suggestions regarding sewing for children. No need to go there, it’s fully covered. The market is saturated. It is my mission to comprise a list of Sewing for Seniors, items for people years older. With Seniors, the elderly, the Age-Wise generation in mind, I asked myself the questions:

What could I create that complements their active lifestyle?
What could I create to make life easier?
What could I make that is more comfortable?
What could I design to provide privacy?
What could I make while Sewing for Seniors?

When I set my mind to this mission, the list grew and grew. With your help, I’m sure it will grow even more!
  

Neck Pillows
“C” (Like a travel pillow) and “Bone" or "Bow-Tie” shaped neck pillows
in a variety of fabrics and colors.
I found this nice Bow-Tie shaped free pattern at Sew4Home.


And, a travel pillow pattern at The Cottage Mama.


Pillowcases
Made using satin polyester for easy maneuvering against bedding,
satin pillowcases are perfect for keeping the hairstyle nice between salon visits!

Lap quilts
45” x 60” minimum size
 
Ready to quilt!
Knee Rug
(I’ll use fleece rather than wool)
38” x 46” average size

Hats
Hats are great for sun protection as well as for warmth.
Any I shared in the Sewing Hats article would work nicely, too!

Phone Pocket Necklace
I’ve noticed telephones have a tendency to fall out of pockets,
they slip down between seat cushions,
then they are not “missed” until one walks into another room
and the phone starts ringing, or worse, a phone is needed.
I need to create something like this very soon!

Shoulder capes
Elegant yet functional, shoulder capes are easy to wear
while sitting underneath drafty vents
watching television, playing Bridge or Uno, or dozing in the easy chair.
A while back, I quickly created one for my mother using fleece.


Shawl
A shawl is similar to a shoulder cape, but a bit more versatile.
Depending on the fabric and style, a shawl would work nicely for a man, too!

No Sew Fleece Neck Wrap
Oh, I hate the drafty draft that comes down the back of my neck.
This is something I “fixed” for my daddy… it was so quick and easy, too!
I cut a long (60”) narrow (12”) piece of dark brown (his favorite color) fleece
and that was it! Fleece is lightweight yet warm!!!
Then I showed him how to wear it without having to tie a knot!
This website calls it a European Loop
Fold in half, matching cut ends together, forming a loop at opposite end.
Place around neck and thread both cut ends through the loop,
tighten as desired.

Arm sleeves
My daddy always complained about his arms – from wrists to elbows –
being cold / chilled so I created “sleeves” out of fleece.
Tapered at the wrist, the seam was on the outside
so not to rub or bother his thinning skin.
I so wish I had a picture of him wearing his sleeves…

Wearable Napkins
Originally designed and created for my mother while spending time in a rehab center,
the wearable napkin functions like an adult bib.
But, for something my lovely momma wears, even at home,
I will never refer to it as a bib!


Walker bags
I have several patterns in my stash for walker bags,
but when I went to make one for my mother,
I didn’t like the way they looked so I created my own style.
She loves it, too!


Shopping bags
(13"H x 12"-17"W x 6"-8"D is the size of a standard grocery bag)
Don’t we all have enough plastic already?
I read somewhere,
over the life of one fabric shopping bag
hundreds of plastic ones will become obsolete!
I hate to think of the loss of marine life
and the tackiness of our beaches
if we don’t put a STOP to using plastic shopping bags!

Personal Accessory Bags
I haven’t yet designed this, but is on the top of my to-do list –
I want to create a flap over bag to keep in the bathroom, next to the toilet.
A discreet storage for daily personal needs, and a great use for those monthly needs, too!
It must be at least 11” long, 6” wide, and 8” tall – I’m working on it! 

Cane covers
 In June, a friend of mine brought her cane to show me at our annual slumber party.
She had thought of me, thinking it would be a cool item for me to create.
It was SO cute covered in fabric up to the handle. I had never seen this before!
(I since have gone on a search and found bunches! Guess I need to "get out" more!)
Wouldn’t this be lovely in a leopard print?!?!
Or, coordinating with the different seasons or holidays?!?!
I will be making this for momma’s cane when I get back to the studio!
She is my beta tester!


NOTE: I’m a “baby boomer” (born between 1946 and 1964). When I began this mission I had in mind my parent’s generation. I realize now many items on my list would also work fabulously for other generations!

What else could I make? Please help me with suggestions!


Tuesday, September 24, 2013

Fabric Origami

Creating fabric origami is a new-to-me endeavor. I’ve never attempted this technique before using fabric, but I have added to my to-do list! I don’t remember where I first saw accents or whole projects created using ribbon or fabric origami techniques. I remember finding them beautifully intriguing. I wanted a quick reference point with the how-to’s. Hopefully, you’ll find them inspiring as well.

I’ve created uncomplicated paper origami projects before. Maybe the process is similar…

I may start off with something small… just to get the feel of working the fabric folds… maybe a butterfly! Google would not translate the Chinese site for me, but the pictures are worth a 1000 words anyway… 


I found these bright cheerful colored butterflies on Pinterest made the same way! Just goes to show what a bit of imagination can do!


Rowley DIY shows us how to do an Origami Ruffle


Threads shares a picture tutorial How to Make a Striped Origami Belt


It’s all in the fold… Fabric Origami Wallet


And, it’s in the bag


I’m sew doing these! Which one will you try?

Monday, September 23, 2013

Ribbon Weaving

An interesting technique I’ve seen across the Internet – Ribbon Weaving. It’s a bit of embellishment I failed to include in a previous article, Make it Pop - Embellish. It should have been there! It can be a lovely addition to any creation!

A contributor on Craftster provided us a step-by-step picture tutorial how to create a Ribbon Lei… I can see using this, not as a lei, but as a trim around the neckline of something… wheels are turning! 

WikiHow also shows Ribbon Leis using a different type of ribbon.


A Legg Up shows us how to weave a ribbon fish… why not pin this little fishy to a blouse? Or, bag?


KT HOM Designs created a video tutorial showing us The Art of Ribbon Weaving. She made this is for a greeting card, but I ask, why not use it as trim on a garment?


I happened upon "Victory Braid" instructions and wanted to share...

Okay! I’m adding ribbon weaving to my to-do list!


Sunday, September 22, 2013

Kitchen Timer

Certainly, National Sewing Month is all about sewing. Fabric and patterns, not to mention tools and products to make the process easier, are THE main ingredients of sewing. However…  

In my opinion, a kitchen timer is the sewist’s best friend.
I don’t know if you’re like me, but I can let hours pass by while I’m working on a project. I get engrossed in what I’m doing and totally forget the ole body also needs to move and stretch. I must set the kitchen timer to do just that – move! 

I went on a mission today to find some exercises I could do during short breaks from sewing. As with “any time” exercises – before beginning any exercise program – it’s a good idea to check with your doctor first!

This is what I found: 

At WebMD, I pulled out to share the ones that are done while sitting. They also have many others in the standing position! They would be good to practice while walking over to the ironing board!

š  While seated, pump both arms over your head for 30 seconds, then rapidly tap your feet on the floor, football-drill style, for 30 seconds. Repeat 3-5 times.

š  Sitting in your chair, lift one leg off the seat, extend it out straight, hold for 2 seconds; then lower your foot (stop short of the floor) and hold for several seconds. Switch; do each leg 15 times.

š  To work your chest and shoulders, place both hands on your chair arms and slowly lift your bottom off the chair. Lower yourself back down but stop short of the seat, hold for a few seconds. Do 15 times.

š  To stretch your back and strengthen your biceps, place your hands on the desk and hang on. Slowly push your chair back until your head is between your arms and you're looking at the floor. Then slowly pull yourself back in. Again, 15 of these.

š  Sitting tall in your chair, stretch both arms over your head and reach for the sky. After 10 seconds, extend the right hand higher, then the left.

š  Let your head roll over so that your right ear nearly touches your right shoulder. Using your hand, press your head a little lower (gently, now). Hold for 10 seconds. Relax, and then repeat on the other side.

š  Try this yoga posture to relieve tension: Sit facing forward, then turn your head to the left and your torso to the right, and hold a few seconds. Repeat 15 times, alternating sides.

š  Sitting up straight, try to touch your shoulder blades together. Hold, and then relax.

š  Women can do kegels -- tightening and holding, then loosening, their pelvic floor muscles (the muscles that control the flow of urine when you go to the bathroom). This will prevent leakage and other problems down the line.

š  Butt clenches are also helpful in today's booty-conscious society. Tighten your buttocks, hold, hold, hold, and then relax. Repeat 15 times. The same goes for ab squeezes – just tighten your tummy muscles instead.

Do you have five minutes to spare? The Dr. Oz Show has a five minute video showing some chair exercises!


The point of all this … have fun sewing, but don’t forget the ole body in the process! Set that kitchen timer and move!!!


Saturday, September 21, 2013

Sewists Stocking Stuffers

Do you ever wonder what to put in Christmas stockings for the sewist in your life? My answer: Sewing Notions! What tools do you wish to see Christmas morning stuffed in your stocking? My answer: Sewing Notions!

While visiting a fabric store, my favorite place to browse is along the sewing notions display. Ah! I love that we have so many helpful tools to make sewing easier!

One can never have too many sewing notions! Duplicates? No problem! One can stay packed in the carry-all for gatherings or next to the easy chair, as well as close to the sewing machine.

What will fit in a stocking?

NOTE: I went to one site (Create for Less) to get pictures to share so you can see what I’m suggesting. I’ve never used this site for ordering. I’m not endorsing them, per se. It was handy because they have everything I wanted to mention!

Seam ripper – comes in a variety of sizes, styles, and colors. I happened to “wish” for something like this one because of the ergonomic handle! Not to mention, it’s PINK!

Dritz Quick Turn – my goodness, I would hate to think of turning anything right side out without having this splendid tool!

Long Tweezers – yes! Not for eyebrows, but for threading a machine! Works beautifully! 

Awl – for that little extra push to get the fabric started. I haven’t seen one in PINK! How cute! And, it’s ergonomic, too! 

Water soluable marker – at least one that is dark and one light (for using with opposite colored fabrics). I found this package of three! 

Point Turner – a wonderful little tool that gets in those corners! I’ve had and used one for years! 

Spring Action Scissors – curved blade, quick grab & snip machine threads – LOVE mine! No fiddling trying to get fingers in the holes! 

How about a package of new straight pins? My favorites are the flat flower heads.

 Liquid Stitch – it dries clear and is washable after 24 hours! 

The little 6” Sewing Gauge is a small tool useful in many situations! 

The “traditional” needle threader looks something like this: 

But, a friend of mine had these “floss threaders” at a quilting event we had rather than the “traditional” needle threaders and they worked wonderfully! (Much cheaper, and never broke!) TIP: You may want to attach a little note explaining it’s for threading a needle, rather than giving a subtle hint they need to floss! 


Take the time to browse through the notion displays! So many more options for the sewist in your life!


Total Pageviews