Wednesday, December 19, 2012

Make a Pillowcase


I’m not re-inventing the wheel, simply sharing how I make a pillowcase. An abundance of tutorials already span across the Internet, I’m just adding my two cents. As I made a couple yesterday (one for a girl, the other for a boy), I took pictures here and there to help with the instructions that we used during this past summer’s Sewing Camp 101.

So Sew Etc
Sewing Camp 101
June 18, 2012 – June 22, 2012
Pillowcase Instructions
Roll Up Method
For a standard size:
7/8 yard large section (cut 27” x width of fabric)
1/3 yard wide band/border (cut 9” x width of fabric)
1/4 yard accent (optional) (cut 4” x width of fabric)

(for a larger pillow, measure the length of the actual pillow and add 2” to the measurement – the band & accent will remain the same)

How to create the pillowcase:

  1. Fold band (wrong sides together) in half (long way) and press (Make sure both edges are placed evenly together)
  2. Fold accent strips (wrong sides together) in half (long way) and press (Make sure both edges placed are evenly together)
  1. Keep accent folded, pin to right side of large section across top. (Make sure all edges are placed evenly together) (Is the brown strip on the boy's pillowcase as I used lace on the girl's)
  2. Move step #3 out of the way for a minute. Unfold band and place single thickness with right side up on top of table surface. Place step #3 on top of accent/large section (it doesn’t matter which is “up” wrong or right side). Work from left to right (make sure left side edges are all together) and remove the original pins one by one and re-pin everything together. (Make sure all edges are placed evenly together)

(Don't worry right now about how the pieces line up on the right end:)

______________________________________________________________________
Fold/roll large section up and up and up, then pull the free side of band up and over the roll.
Be careful not to catch the "large" piece in pinning or sewing!
  1. Now you’ll have the right sides together of the band, with everything else rolled up inside! Starting at the left side, pin through all thicknesses. (Make sure all edges are placed evenly together)
  2. Sew across using a 1/4” seam allowance (back-tack at start only). Remember: pull out pins before sewing over them!
  3. Press seam to meld stitches.
  4. This is the fun part! Pull out the fabric from inside the “tube”!

It's coming! 

Fold bottom up to the top edge and trim off, making all layers even
 
  1. If you want to sew decorative stitches across the band, now is the time! It's much easier now when flat, before you go on to step #10. I realized this in the nick of time!
  2. With wrong sides together, match up the band, accent edge, and pin along the side and bottom. (Make sure all edges are placed evenly together)
First step in creating a "French Seam"
  1. Starting at top of band, sew 1/4” seam allowance, stitch down side, pivot, sew across bottom. Remember: pull out pins before sewing over them!
  2. Carefully trim corner.
  3. Press seam to meld stitches

"French Seam"
  1. Turn outside in and now right sides are together. Press out the folds made from stitching. Pin occasionally the same places as before, and stitch but now use a 1/2” seam allowance down side and across bottom. DO NOT TRIM THE CORNERS!!!
  2. Press seam to meld stitches.
  3. Turn right side out, use knitting needle to gently push out corners. You now have a lovely totally finished pillowcase (without any raw edges showing inside)!

I based these instructions on this video:

Hope you create a pillowcase!

Sunday, December 16, 2012

Sisters of the World

It’s been a while since I’ve shared an amazing website or blog discovered or, in this case, a Facebook page. I’ll try to do better once January arrives!

The universe is amazing when you trust her to bring for you what you need most at the time and allow her to take away what no longer serves you, then you are in the perfect place in the perfect time. Melanie Wadham

If you’re on Facebook, I highly recommend following Melanie’s page: Woman2Woman. Within her “about” section, she quotes Pam Brown:
No woman is without sisters, however desperate, however lacking in kin. For all the women of the world are bound together as a family, by common experience and concern.
You will find uplifting quotes sprinkled all over her page. A recent one she shared resonates with me: “Some changes look negative on the surface but you will soon realize that space is being created in your life for something new to emerge.” ~ Eckhart Tolle

And, she posted this from Lewis Carroll:

“There is no use trying,” said Alice; “one can’t believe impossible things.”

“I dare say you haven’t had much practice,” said the Queen. “When I was your age, I always did it for half an hour a day. Why, sometimes I’ve believed as many as six impossible things before breakfast.”

I discovered this video when reading through her page:


For a variety of reasons, getting through December is hard on some of us. It’s this time we need to fall back on our sisters. So, sisters of the world, let us join hands and give a little love…


Thursday, December 6, 2012

When things go wrong


Yesterday - within the Facebook’s Sewist Group - we had a discussion about when everything seems to go wrong while sewing. 

Sometimes, enough is enough ripping out stitches!
Sometimes it’s better to just walk away for a while, and then come back to the project.
Many times, I/we keep on and on until total frustration sets in and our mood sours beyond repair for the remaining day/evening!

What can we do during this time when we’re working on a deadline, and can’t afford the time away from the project?
What can we do to change the mindset? Find the happy sewing place again?
What will lift our inner altitude and get things back on track?

Here are several suggestions the group came up with, plus some of my own:

  • Wash face and put on makeup, including lipstick!
  • Spritz on a favorite perfume
  • Spray air freshener around the sewing area
  • Light a candle
  • Go for a brisk walk – get fresh air & the blood pumping through the brain (and fingertips) again
  • Change up background noise … television/radio/silence
  • Pray continuously


What would you add to the list for others to try when they’re having a bad day/go of sewing?


Thursday, November 22, 2012

Thanksgiving Day - 2012


The Lord fills my heart with all the wonderful blessings around me.

Thank you, family and friends, and all those I hope to meet someday, I am blessed you are in my life.

I pray each and everyone has a blessed Thanksgiving Day!


Thursday, November 15, 2012

English Peas & Thanksgiving


Where has this year gone? It’s difficult to wrap my head around the fact that this time next week it will be Thanksgiving. My goodness! I need to get my recipes together and a grocery shopping list prepared!

Throughout all the years, I’ve missed sharing only one Thanksgiving Dinner with my parents. I remember that year as if it was yesterday. Although I then lived in Shreveport, work took me to Hot Springs, Arkansas for six weeks training – landing Thanksgiving near the end of the sprint. I just couldn’t make it down to Dallas.

It was an odd feeling that day, eating alone at a restaurant. Since Daddy became a diabetic, I’ve learned more about nutrition and the balance of foods in the diet. Because of the lack of side dishes offered, it was the Thanksgiving I learned to eat English Peas.
2011 Thanksgiving
That Thanksgiving many years ago instilled in me the importance of celebrating the holiday with family, specifically with my parents. When I can spend any day with them, is a celebration within itself. My heart/mind knows I don’t have many left.

For me, Thanksgiving is an extra special time (Christmas is as well, but I’m trying to stay focused here, on point).

Last year, I told Momma I really wanted to prepare “next year’s Thanksgiving” meal for everyone. I rarely entertain anymore. I can’t remember the last time Bud & I had guests over (that’s another story and I’m not going off topic).  

She forgot…

I reminded her.

I’m looking forward to grocery shopping this Sunday afternoon, then Monday when I start baking pies!

Maybe I ought to add English Peas to the menu…

 How will you celebrate Thanksgiving?


Saturday, November 3, 2012

Donations for New Jersey - Mail Monday!

This is where I'm sending my (first round of) donations on Monday (11/5/2012):

Lacey United Methodist Church
Attn: Pastor Linda Applegate
203 West Lacey
Forked River
, NJ 08731-3509


Keeping checking their Facebook page for their wish list of needed items! 

After searching the Internet for a contact somewhere along the hit-hardest Northeast coast line after Hurricane Sandy, this is the article I found that caught my eye and caused me to call:


I spoke with an Elaine, a church member and volunteer that runs the church’s Thrift Shop. When I told her I was calling from Texas and wanted to know how we could help, she was so excited!

She also shared there are several other shelters in the area and Lacey UMC will be happy to coordinate the items we send with them so everyone gets what they need.

In addition to warm clothes, she said they really need toiletries such as the small size shampoos, toothpaste/brush, and deodorant. They also have volunteer crews that are going out and helping people clean up their homes (if they have homes). Therefore, they also need cleaning supplies. Elaine mentioned specifically needing duct tape and rubber gloves.

I’m certain they will be thrilled to receive anything you can manage to get to them as soon as possible!

As of about 4:15 today this is what their Facebook page shows they are still hoping for:
  • - paper towels - rubber gloves, work gloves
  • - sponges - contractor grade garbage bags
  • - bottled water - blankets
  • - pillows - socks
  • - diapers - baby wipes
  • - disposable face masks - plastic storage totes


Please share this with everyone you know! The folks need help NOW!

Hope to see you at the Post Office Monday!


Wednesday, October 31, 2012

Happy Halloween!


There were going to be others, but this year I managed only one Halloween costume for the 18 inch dolls like American Girl, Springfield, Our Generation, etc. A year or so ago I stumbled upon the cutest toddler’s costume and pinned it immediately. I didn’t know at the time how – just knew someday it would happen. And, it did! Now, somewhere in Texas, the chicken is on an AG doll, ready to trick or treat!

What a fun fun challenge!

During the interim, I happened across the tutorial: MakingAmerican Girl Doll Tights from a knee sock and, of course, pinned the link under Clever Ideas for safe keeping until needed.

Sofia (Springfield) was a good sport throughout the process!

I followed the directions to make the tights from a sock I had, and cut out the “feet” from felt. I then put the sock/tights on Sofia and hand stitched the feet on top of the sock.


The “base” is from the smallest onesie I could find/buy
then adjusted to fit Sofia.

I used a second onesie to form the hood.
Once the 2nd was pinned down to the first,
I hand stitched, then trimmed away excess.
I then attached the beak and red comb (or crest) on top of the hood.

With needle and thread, I quickly realized the boa used for the toddler was MUCH too big for Sofia. To make this work, I had to come up with Plan B.

I took plastic wrap and totally covered Sofia, securing well, then put her onesie back on.

Yep, pulling out individual feathers from the boa, and using good ole fashion Elmer’s Glue worked great. Tedious, but great. As a result of this plucking, the boa also became thinner. Then it was perfect size to wrap around here and there and across the shoulders and over the chest and back up to the snaps between her legs – hand stitching along the way to secure.

I let the costume (glue) dry thoroughly for several days before removing, to remove the plastic wrap and put the tights back on, then the feathered onesie.

She’s ready!

At the last arts/craft show, I had her standing at the table facing the aisle … so wish I had a candid camera going to share now! The expression on people’s faces (especially the little ones that were at eye-to-eye level) when they realized what they were looking at was absolutely priceless!

I’m thrilled the woman who bought the Chicken Costume was as excited to get it as I was to create it!


Saturday, October 20, 2012

Another First - A Fun Challenge


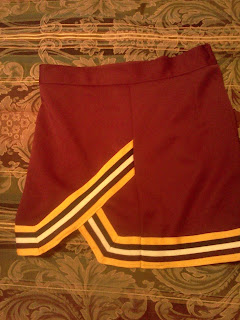
Last week, my sister asked if I could create an 18 inch doll cheerleader uniform to match her niece’s uniform – with a due date of October 26th (her birthday!). Without hesitation, I answered, “Yes!” However, I had to ask for a couple of things. Because of matching school colors, I wanted the fabric provided. I also needed several pictures showing different views of the little girl’s uniform for a “go-by”.

Over the weekend, while in Dallas doing an arts/craft show, I received the “washed and dried” fabric (THANK YOU!). Then, over the course of the next few days and requests for specific views needed, I received enough pictures via email to get a good idea of what needed to go where. And, the challenge began!

Light source is not good... coming from computer's monitor!
Needed to see side seam - light source coming from behind camera - MUCH better view!
In case you didn’t know, an 18 inch doll’s body, and where it bends and where it doesn’t, is a bit different than a real person’s body. Therefore, rather than a pull over, the top had to have an opening along the back. No problem. Done.

NOTE: Sewists know stretchy fabric (which this was a lightweight knit rather than quilt type cotton), stretches out of whack VERY easily! One must take extra care when dealing with knits!
Waiting to hem shorts whenever skirt is done!
The original uniform had webbed trim zig-zagged together to make the “stripe” – which is much too wide for an 18” doll. Therefore, I had to create the stripe using the knit fabric. That was fun!

After spending hours trying to work it out proportionally, I realized the original skirt’s stripe detail was too big for the doll’s skirt (even though the stripe was much smaller on the doll uniform). There was simply not enough skirt fabric, or “time” for it to come around and make the V. The doll’s skirt stripe is now simply around the hemline.

While meeting this challenge, trying to get it perfect, Mother kept reminding me when she made my oldest niece’s uniform to “match” my High School drill team’s uniform. Two year old Leasa was our mascot my senior year. It didn’t “match” exactly, but it coordinated nicely.

The letter “H” – oh so tiny! I tried different ways to get it cut out from the fabric provided, but it kept tearing apart due to the thinness along the sides. My sister sent me a commercial letter H but it was too big! I finally decided to simply cut it out of one-side sticky thin foam! Seems to work okay… will be a gently hand wash item!

Sending out in the mail on Monday and it should arrive in time for her birthday on the 26th! Love it when a plan comes together!

P.S. This was a fun challenge!

P.S.S. I absolutely LOVE the back drop Mother created for me and my doll pictures!!!


Sunday, October 7, 2012

I'd rather sew


In January 2012, I wrote a series of themed articles on different marketing strategies. The plan was to do this every Monday throughout the year. I will be the first to admit, the “Monday Marketing” aspect may have helped in some ways, but then went flat when I got so confused with all the information out there – it was a struggle to make it through January! Because…

I’d rather sew.


Going Viral Through Social Media relies on others to share!


Monday Marketing – Aha Moment mixing it up all year!

But, it’s time to do a bit of marketing prep. I have business cards. Now I would like to create a brochure for the upcoming craft and specialty show in Arlington, Texas. I’d like a little bit of information for visitors to take away with them, for reference and provide contact information. So, I go back to the ole trusty Google and do a search:


I find a gazillion opinions.

A couple tips/suggestions, however, keep reoccurring:
  • write a catchy headline, something that will grab their attention
  • focus on persuasion, not information
What type of attention grabbing headline could I write? What do I write about doll clothes or aprons or e-reader covers, to persuade someone to purchase from me rather than someone else? Geez!

I’d rather sew!


Total Pageviews